Showing posts with label diy. Show all posts

8.01.2012

Creating a look book // Stenciling & Foil Art

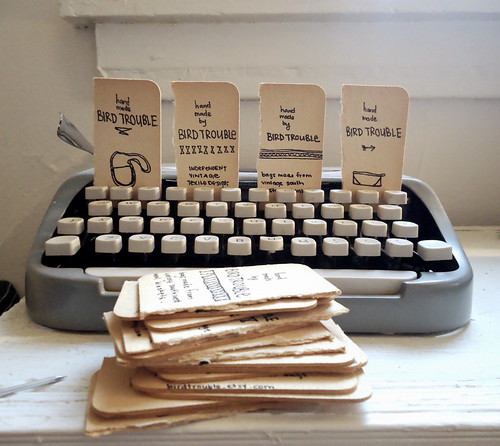
I´m creating a DIY look book to give as a handout to a few local boutiques in Chicago. I´ve thought about the idea of a look book for a while now, and I´ve gone forth and back in my brain about ideas on how to really impress them. Only recently I became obsessed with the idea of making my own after seeing my roommate make a book cover. I create things - it´s what I like to do. So not just sewing my bags, but I also designed this blog and my logo. I love creating all of this myself, though it may not be the most professional looking, and it may be over whelming b/c sometimes I think I spend too much time on it when I should be sewing. But this is what it is to start up a brand by yourself; work. All of it. It´s cool and I rather love it.

Feel free to ask me any questions in the comments & follow the creation by clicking the tag label : Look book Creation.

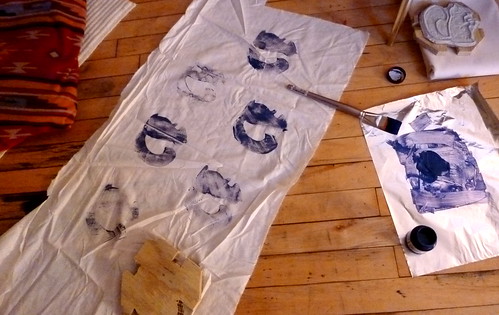
In this post, I´m creating my design, creating my stencil, and testing out the foil art on my design for the first time on a piece of paper. I´m doing this to not waste the material I actually want to put it on.


H O W   I   D I D   I T :
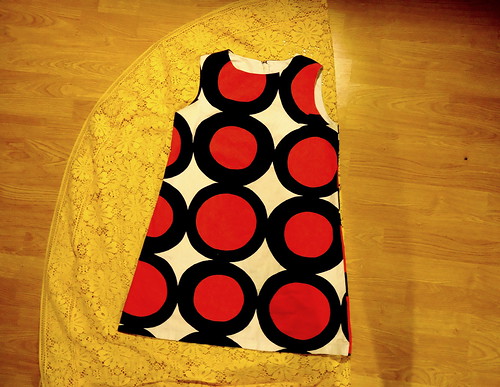
Design your stencil - think of the ideas!
Trace it onto your stencil paper exactly how you want to cut it /// If you please, leave openings in the plastic to open up any holes - if you don´t, your ¨O¨s are going to be completely open O´s.
Cut your design out with an exacto knife. Watch your fingers.
Apply your Adhesive Paste. I was careful here, making sure I kept a steady hand and close attention so it didn´t bleed under the stencil. Just go slow!
I cleaned up any spots and added a little more adhesive without the stencil.

I then let it dry for an hour. I waited anxiously and watched some Life During Wartime. Its good.

I placed my gold foil on top of the adhesive. With a brush, I gently brushed away the extra gold. I didn´t really handle it with my hands at all. After a bit, I perfected the placement & stopped fiddling with it.
I then applied my top coat sealer.

Now it´s drying until I can see it again tomorrow morning. I plan on working on this tomorrow afternoon on the material I actually want it on. See you then! -Alexz

6.24.2012

Wears : DIY Band Tee & Academy Jewelry


Against Me! was one of my favorite bands going through the start of high school. I remember the day my friend had me listen to What We Worked For, I listened to it over, and over, and over. I was instantly hooked. With most of their songs, I remember feeling like they were taking the words right out of my mouth and screamed it right back at me, and the feeling of thrill and acceptance was so strong.

I saw them a few weeks ago at The Congress Theater, and though they've done a lot since I saw them in high school and played mostly new songs, they were still impressive as ever. They played my personal favorite, Pints of Guinness, and I was more than fricken' excited... I almost had my shoe taken off of me.

Wears:
- DIY cut up shirt, because they only have larges left with this design. Which is totally easy and anyone can do this! I simply cut the neck a little boat neck style and cut the sleeves off, but cut deep into where your ribs are.
- Handmade quartz and bullet shell necklace from Academy Jewelry. This is my rediscovered favorite necklace. I won this in a giveaway a few months ago and felt so lucky. I could wear this necklace every day, and basically have been. It definitely adds to my outfits like these, when I'm a loads more casual.
- DIY cut and folded from a pair of high waisted Levi jeans that I found thifting. Also super easy! I do this to all of my old jeans that I'm just feeling bleh, over. Plus, I love cut offs. So. Much.


Today I'm out and about the streets of Chicago for the Pride Parade. It's starting right down the street from my apartment this year. I haven't seen it since high school because one year, I was side punched in the face. Not fun! I'm really certain that I'm not a huge fan of insanely packed crowds of drunk people, but I'm giving it a go this year. Trying to step out of my norm, enjoy all the celebration, hopefully spend time with one of my besties, and take lots of photos. The good thing is that my apartment is a hop away if I get sick of it!
Alexz

5.28.2012

DIY - Not so cheerleader anymore.

- Before -
Once, I had this adorable dress. This dress had sleeves and a very, stand-out, collar. I mean, it wasn't ugly before, but now that it's Chicago summer, I felt the need to be make it more Chicago summer-friendly! If it's even possible for polyester to 
get Chicago summer friendly... I do admit I could get pretty warm it in, but it's perfect for the cooler night like we had on Saturday evening.

All you need is a little DIY to make something old into something new!


- After -
Now it's more practical for the summer season! I love it. I bought this dress thrifting in Milwaukee a few months ago. I'm pretty sure it was only $3.00! I've wore it with the sleeves in the winter, but maybe only twice. I wasn't attached to the sleeves or the collar. Sure it was a cute uniform but I felt too restricted. Instead of feeling restricted, now I feel sort of very cheerleader-ish. Ha. Either way, I love how it turned out. I have so many dresses I need to alter and make suitable for my style now. But that's second priority next to bag designing and creating, and altering friend's clothing. 


To begin altering this dress, I envisioned how I wanted it to look like after I was finished with it. This dress is simple because I am just taking pieces off and finishing edges. Then I...
  • I seam ripped the sleeves and the collar off. 
  • When I took off the collar, it unthreaded the seam that the zipper was sewn onto the dress with. I re-pinned the zipper back to it's place and refinished the stitching for the zipper in orange thread. 
  • I finished the raw edges, where the sleeves were missing, with two rows of orange stitches over a double folded seam. 

I like the small details of pops of color and double stitching gives it a professional look. A really simple altering made this dress into something new. This would even be easy with hand-sewing, if that's all you've got! You don't have to be an expert to do this, you just need patience and the willingness to get it right. I'm going back and forth on if I should be adding some buttons down the center of the chest. But then I could also add one of my vintage trims to the bottom of the skirt. What do you think? Should I add anything else?
xoxo, Alexz

2.29.2012

DIY - Studded boots


Okay, so studs are pretty popular now, from what I've noticed. Which is cool in my book, but sometimes too many studs can be a little overwhelming to me. My best friend, Christina, bought me these boots from Steve Madden two winters ago...and they are my favorite pair of boots I've ever owned! They've recently started to become really weathered, and the holes at the soles have become more of a nuisance. While re-soling is something I need to go to a professional for, I can add to the distressed look and refresh my boots with some STUDDIN'. 

Doing both boots only took me 10 minutes. Not only is this easy and fast, but the outcome gives a refreshing makeover! I also added some new boot laces that I found at the thrift store.

MATERIALS:
A bag of 2 prong studs. Mine are the rounded cones. You can google where to locally purchase your studs, or you can online shop on eBay, Etsy, or at Angry, Young, and Poor.
Scissors to make the holes - or a seam ripper will give you better control.
A hard surface to help you push in the prongs - I use a spool of thread or the end of my drafting table.

How to:
  1. I basically went into this project with no planning, so to start, I visualized where I wanted my studs and how many could fit in each row.
  2. I pressed the studs a little hard into the leather to mark the guidelines so I could know where I'm making a hole with my scissors.
  3. Slowly, I punctured holes into the leather with my scissors. Make sure you do not puncture too hard because then you'll end up with a HUGE slit and the prong will be too small for it. 


12.10.2011

DIY dream bag pt.3 :: Shop vacation


So in between making bags for Bird Trouble, I'm also currently revamping an old vest into my dream bag. Basically, I need a bag that is big enough to fit enough stuff, but not too large. I like short straps, but I also like messenger straps... so it's still in process, but slowly and surely. Currently there's no lining, so I might even open it a little wider and add more leather. So far, I'm digging it! A LOT! Like, so so much, seriously.


Prior posts on this DIY :: 1 ,

And Chicago, don't forget to come say hi to me at Eskell!
Since I'm going to be selling all of my merchandise at Eskell today,
Bird Trouble online shop will be on vacation until Sunday. That is all!
Alexz

 ::::: Here's the info from the gal's at Eskell :::
Join us and Chicago designers, Laura Lombardi, Shades of Grey, Mineralogy, Red Head Prints, Lady Faye, Bird Trouble and more, for this one day shopping event at Eskell. Designers will be selling merchandise that is not currently available at Eskell. This is a perfect opportunity to stock up on jewelry and trinkets for your loved ones this Holiday season! Shop for others and shop for yourself. In addition, the entire Eskell Fall 11 collection will be 30% off. Spirits included! We hope to see you Saturday. xoxo, Eskell


Eskell
1509 N. Milwaukee AveChicago, Illinois

12.02.2011

DIY :: Farewell studded vest ::: Hello B.A. bad


OK. Remember THIS post? And how I said I wanted to do that?

My roommate was kind enough to offer to record me making the first cut into a vest I used to wear for two years straight. I don't know why but I have a huge attachment to this vest. Probably because it's a good reminder that maddog and beer do not mix, and never speed in the country where there's no street lights. Heart break, teenage angst, nights away from home.
I was walking to the bathroom today and I don't know, it just struck me. So! Now I'm going to make a bag personally for myself. I was kind of freaking out, and I kind of still am, but I'm pretty confident that this is going to be the most bad ass bag ever, and it's all mine!

After I was so awkwardly, but in the best way, recorded by my roommate... I did more cutting and took some photos (and a video I need to figure out how to edit) with a normal camera (not an iPhone). I'll update ya'll later. 

:DDDD
alexz

11.30.2011

DIY :: Business cards from vintage coasters.

Hey everyone! I'm super excited to show you these business cards and hang tags I made. Trying to sell yourself as an artist and a small business, you have to have business cards! I change mine up every time I run out. I'm pretty sure that they'll never be the same, and even though branding is important, I think it's also important to grab someones eye and get them talkin'. It's neat because everyone gets to see little glimpe of what you can make if you make your own business cards. I'm not just sewing these bags, I'm also slaying over every other part: like making business cards, and trying to build myself.

I found these vintage beer coasters in this old candy box in the dirty, quite disgusting, estate sale a few months ago. I've had them laying around until something inspired me to make them into business cards. Each one is different, and since I love to doodle and I love script, I decided to include both in almost each one. I think it really says something about what I want myself & Bird Trouble to be, vintage inspired, sustainable, and ever-growing.

   Show me your business cards, handmade or not!   

xoxo,
Alexz

11.27.2011

The thought of a side project

Happy Sunday. I was planning on going celebrate a friend's birthday last night, but ended up taking a 10:30pm nap, and not waking up until 3am. Where then I proceeded to catch up on the newest season of Dexter (H. S.) until 5am. Then sleeping until noon today. I guess my body was really begging for some sleep?

My side project for this week, even though
it's a small one, is to replicate an idea like this:

But using the vest that I studded, stenciled, and sewed in high school.

This guy was on my back for almost 2 years straight. There's some sentimental value to it
but really not much. It sits under all my clothes, but I'll never wear it again. Unless I wear it for a special event, for humor, but I just don't want to throw it out. I might not use only plants.... I was thinking of things, like christmas lights... and maybe small little dinosaurs. We'll see how I'm feeling.


Has anyone else changed the something that they've had for years, into something different?

Until next time!
Alexz

10.22.2011

Studio Saturday :: Lace dresses, fabric, blanket bags.

STUDIO SATURDAY


  • Remember this picture from the other day? That little yellow lace dress is the result.
  • Found this at the thrift store today. I'm thinking about another standing tote? I really want to include the tassles some how.
  • Process of the second blanket collection. I did the leather differently on these. Plus, this leather is a lot easier to manage. I'm digging the color combination of these! Maybe enough to keep one for myself!
  • Last, the four blanket pouches while they were just cut. I love that fringe!
Tomorrow is moving day!!! See ya'll soon!
xoxo,
Alexz

10.19.2011

Huge THANKS! :: & a DIY


The first collection of Navajo bags were a huge success.
                    So, a million kitten kisses
in thanks to everyone for all the compliments, the encouragement, and support! There's only one more for sale. Here's a photo of my mother's package that is going to be shipped out to Mexico for her. Lucky parents, they're hiding out from the rain and fierce winds that so rudely flipped my vintage umbrella tonight. Good thing I'm comfortable laughing at myself, and I laugh easily.


Despite this weather, I try to remain cheerful and that means I'm going to start busting out obnoxious color clothing and my very exciting polyester dresses. Yay! I spruced up a cute lace dress with a dip at the hem from the front to the back, giving a re-birth to this once before table cloth! I bought it at the flea market this past time I went, for only $3.00. I can make one more, or I can save the rest of the material for bags.
What do you guys think?


If you're my IG friend, you've already seen the finished product. I just need to take a photo with a proper camera and a proper self-timed angle. haha. I feel lame posting iPhone photos all the time!

I HOPE EVERYONE TRIES THE SALTED CARAMEL MOCHA FROM STARBUCKS.
K, thanks.
Alexz.

9.10.2011

DIY :: Block Stamping


Hello!
I went to Blick the other week and collected some fun stuff for block printing. I made my own squirrel stamp (two, to be exact) using the Blick E-Z-Cut Printing Blocks by cutting with Speedball Linoleum Cutters. The printing blocks are super easy to cut through, which is awesome for speedy carving, and could be dangerous because I almost sliced my fingers off a few times. It gets really fun though.
Then James, being the crafty little sucker that he is, cut some wood for me to mount it on. So sweet. I printed them with a fabric ink onto muslin to test it out and I ended up FORGETTING that I was just testing them out and ended up printing all my muslin. Oops! Looks like I was having too much squirrel-ish fun.


And that's what some of them look like. I also tried to make a Bird Trouble stamp, just for fun, but forgot that once it was printed, it was backwards. Trial and error, baby, trial and error.


As you can see, Cheeseburger was having a mighty fun time sitting on the couch, SCREAMING, at me for attention. Might as well just walk over all my fabric, kitten! Oh wait, she did. Kitten prints would be cute. Oh and also, this is my Caturday post too. Take that!
Have a great weekend! I can't wait to make a post next week with some pictures from Renegade. EE!!!

xoxo,
Alexz

9.01.2011

Handmade Dainty Dress - Cotton Pull Over


Tuesday afternoon, I took the same pattern from the square shirt to create a dress. Basically, from the end of the bottom of the armhole, I made a straight line with a ruler to an appropriate length of a dress. I like mine above the knee. I used one of my dresses in my closet as a reference. It's awesome how your clothes as home can be used as guidelines to create new clothes!


I finished it within a few hours so I could wear it to work. I'm pretty speedy when it comes to sewing since I've done it for so long. I always do this though, I cram a project in so tight but it always seems to work out in the end. Plus, when I'm working on one item, I like to enhance little details. This is the dainty little cotton dress that I finished last night! I love it! It's so comfortable and light. Perfect for summer and for layering up in the colder weather. Best thing: It's one of a kind! Made from a recycled breathable cotton. It's an easy pull-over-your-head dress with no closures. Fits from a small up to a large easily.

How can it fit from a variety of sizes?:
It's cut straight from the armholes making it roomy and a 'square' cut. The purpose of the belt loops helps you dress up and play around with different colored/textures belts to enhance your waist. **In the picture: I'm using a thrifted brown belt that fits my waist, but not my hips.**

There are leather straps accented on the sleeves to create a relaxed slouch look but hold some structure. There's a bunch of simple white stitching detail on the seams. I'd like to add more on the side seams tonight. I doubled stitched at the hem. I also added a leather hanging label with "BT" burnt into it.

last two photos were edited in instagram. follow me @birdtrouble if you're an instagram user!

I'm a little worker bee. What have you been working on lately? Anything you're super proud of?

xoxo,
Alexz

8.31.2011

Handmade Pinstriped Slouch Shirt

My lovely panda coworker, Lauren, wore this great shirt this other night that fit her like a glove. I loved the comfortable, minimalist look of it. I told her "That looks so easy to make!" and she looks at me, says "It's like a square!" It was like my brain stopped and I had to go home instantly to figure out a pattern so I can make my own.

The other night, doing laundry, I came across this simple square cut shirt I bought from Target a few weeks ago that I love. The fit of it is perfect for me. It's loose, comfortable, off the body, with larger arm holes (perfect for when I ride my bike or a long day outside!). The shape of it reminded me of Lauren's shirt. I took my Target shirt, laid it on top of some fabric, and simply cut around.

This is what I came up with! The fabric I used was thrifted. It feels sort of like a.... bed sheet. Really light, thin, but comfortable. It hangs perfectly! I added some simple scraps of leather for details and to make it more unique. Either way, it's one of a kind!

I apologize for the horrible pictures as of late. I've been using my iPhone WAY too much lately! I do have some real photos to share soon. Until then, iPhones have gotten the best of me, again.

What do you guys think?
I'm thinking about adding some simple shapes to Bird Trouble for the fall.

xoxo,
Alexz

8.21.2011

Newest work :: Day backpack from a vintage apron.

This past winter, I attended the Vintage Bazaar in Pilsen (a neighborhood here in Chicago) in hopes of grabbing some great deals and unique items.

Unfortunately, we didn't know how early they were closing down so we ran around like chickens with our heads cut off for the last 30 minutes. I wish I would have snatched some pictures of the space they had in Pilsen, it was this huge factory with those awesome windows (the ones in expensive lofts that you
wish you owned). It was wide open with tons of vintage sellers.

I did end up leaving with a few items... those being of a cow horn, a denim mom dress (super cute after i shortened it!), a denim dad shirt (so James and I could be the denim couple), a vintage car mirror, and a pair of 1960's vintage sunglasses that had an 'Advertised in Play Boy' tag. Those, unfortunately, broke for the 4th and final time this past weekend.
I've got the bad sunglasses luck.


My favorite item I left with, of course was material that I was going to be able to work with. This
AWESOMMMME work apron with paint splatters, an address from the south side of Chicago (Cermak Rd.), and some great pockets. I immediately wanted to make it into a backpack. I knew I wanted to.
The straps on it were perfect for tie-strings and a vision of a perfect day backpack. I love buying vintage textiles that I can make into something different. Much more than productive that collecting squirrels and squirrels, and squirrels. (NO, IT'S NOT!)

I had this leather jacket that James let me rip up. I completely de-stitched each seam until it was just a jacket unraveled. I used those scraps for the straps and was even able to double fold it for comfort.

I just really like backpacks and I may be a sucker for them. I think I'll definitely try to make more backpack styles in the future. This one definitely inspired me to make more.

Learn more about the one of a kind backpack / or buy it in my shop HERE.

xoxo,
Alexz

7.16.2011

Altered: A Large Women's Shirt.

FROM THIS:


TO THIS:

How?
First, I cut off the sleeves into the shape I was imagining. I sewed the sides in to roughly fit me. I added two darts in the front and two darts in the back so a more fitted feel. I sliced the back of the collar so I could add a button closure. I braided some pieces of scrap. I sewed a scrap of leather on top of the raw part of the braid for the collar and I added two round studs, just for the heck of it.


PAIRED WITH THIS:

I sewed that skirt the other night too. It's light, it flows, and it makes me feel super girly.

Also, can I mention that I just bought sandals yesterday?
It'd be maybe my.... second time buying sandals? They feel so funny.
I don't know if I like them yet but they're pretty squishy and comfortable since they're from that Born brand. Does anyone have any sandal suggestions or very open flats that they could recommend?

xoxo, Alexz.